Custom Built Digital Stereoscope
Ever since I started doing digital stereoscopic photography I lacked a portable device for viewing my images in uncompromised quality. I've had both a projection and table-top digital stereoscopic viewing system for several years, but I missed the simplicity and unrivalled experience of viewing the old film slides in a quality back-lit viewer.
A historical milestone was the introduction of smartphones with high resolution displays marketed as 4K - namely the Sony Xperia Z5 Premium and the later Sony Xperia XZ Premium. Their resolution is high enough for viewing a side-by-side pair under magnification without seeing any pixels.
Now (written in 2019) it is not difficult to find these phones on the used market for a fraction of the original price, making it easy to get one to be used exclusively as an image viewer.
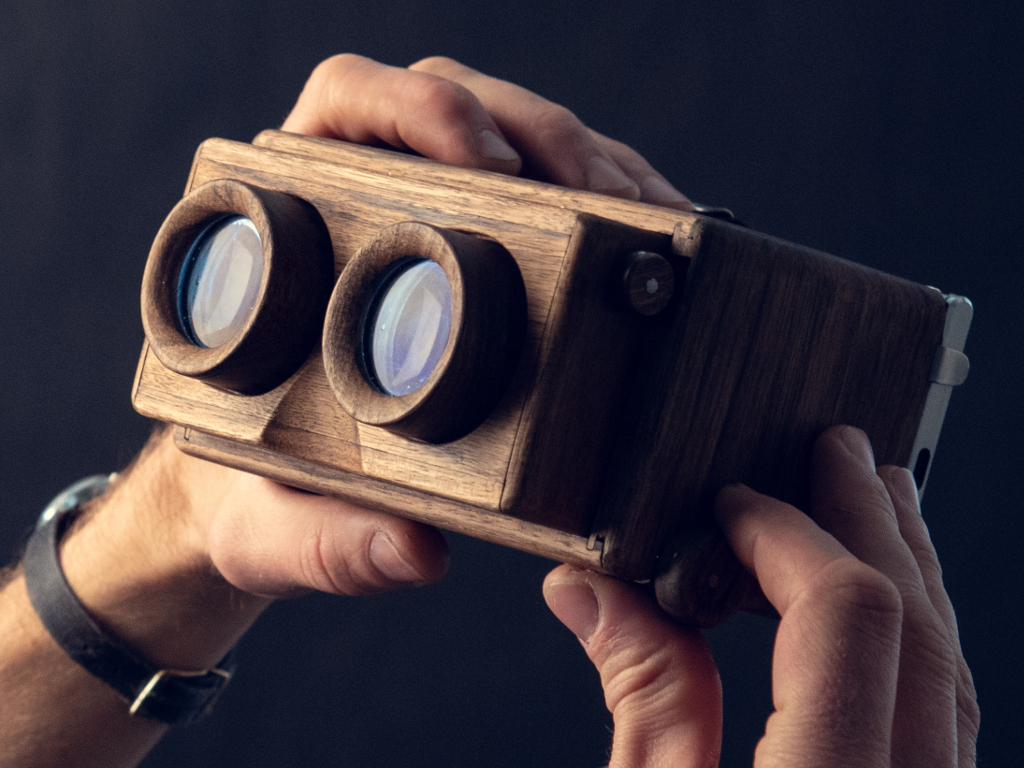
photo by Ilona Sochorová
The 4K phone
I bought the later Sony Xperia XZ Premium Dual SIM model in mint condition. The screen has excellent contrast and colours and the individual pixels are indeed invisible. However, a close examination of the screen under very high magnification reveals that the RGB pixels are not arranged in a perpendicular grid but rather in a "herringbone pattern". This pattern can be sometimes perceptible in larger uniform areas of a light colour when using the phone in a stereoscope - but usually it is barely noticeable.
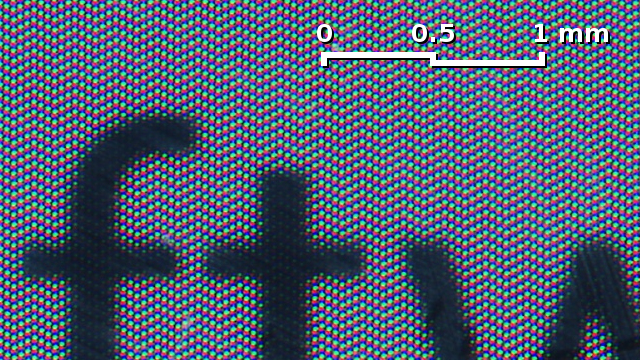
A macro shot of the phone screen, showing the pixel arrangement and an approximate reference scale. Photo by Miroslav Kopeček
The density of the pixels is obviously different in the vertical and horizontal direction. Luckily, the horizontal spacing, which is more significant in stereoscopy, is the finer one. But it just goes to show that calling the resolution "4K" has more to do with marketing than with the exact number of pixels. None the less the quality of the screen is outstanding and adequate for the purpose.
There has been a lot of discussions and uncertainty concerning the limitations of the phone software, so I would like to describe the way I use it. There might be other solutions, but I am now fully satisfied with the performance. I am not familiar with the other "Z5" model - which may have different issues.
Switching the phone to 4K permanently
With the usual (factory) settings, the phone's display is only using a quarter of the native resolution most of the time (FullHD). Only specific applications take advantage of the full native resolution - namely the video viewer and the default "Album" image viewer. Although you can use the "Album" viewer for displaying your images, it has a lot of limitations - the major one for me was its inability to use the hardware buttons on the side of the phone to advance to the next image.
However, it is not difficult to turn the phone to 4K entirely and permanently. You have to enter the developer mode in the phone settings and either use a shell terminal application or an adb connection over USB from your computer to enter those two commands:
- wm size 2160x3840
- wm density 820
Now the phone will be using the 4K resolution all the time and this setting will not change if you restart the phone. Repeating this process might only be necessary if you upgrade the system.
I did my best to give clear and detailed instructions on this separate page. It is also possible to google tutorials if you are not familiar with using the developer mode and the command line.
The application for making phone calls was reported to crash with these settings and perhaps there might be other issues - but neither of them matters if you intend to use the phone only as a stereoscope.
Image format and the viewer application
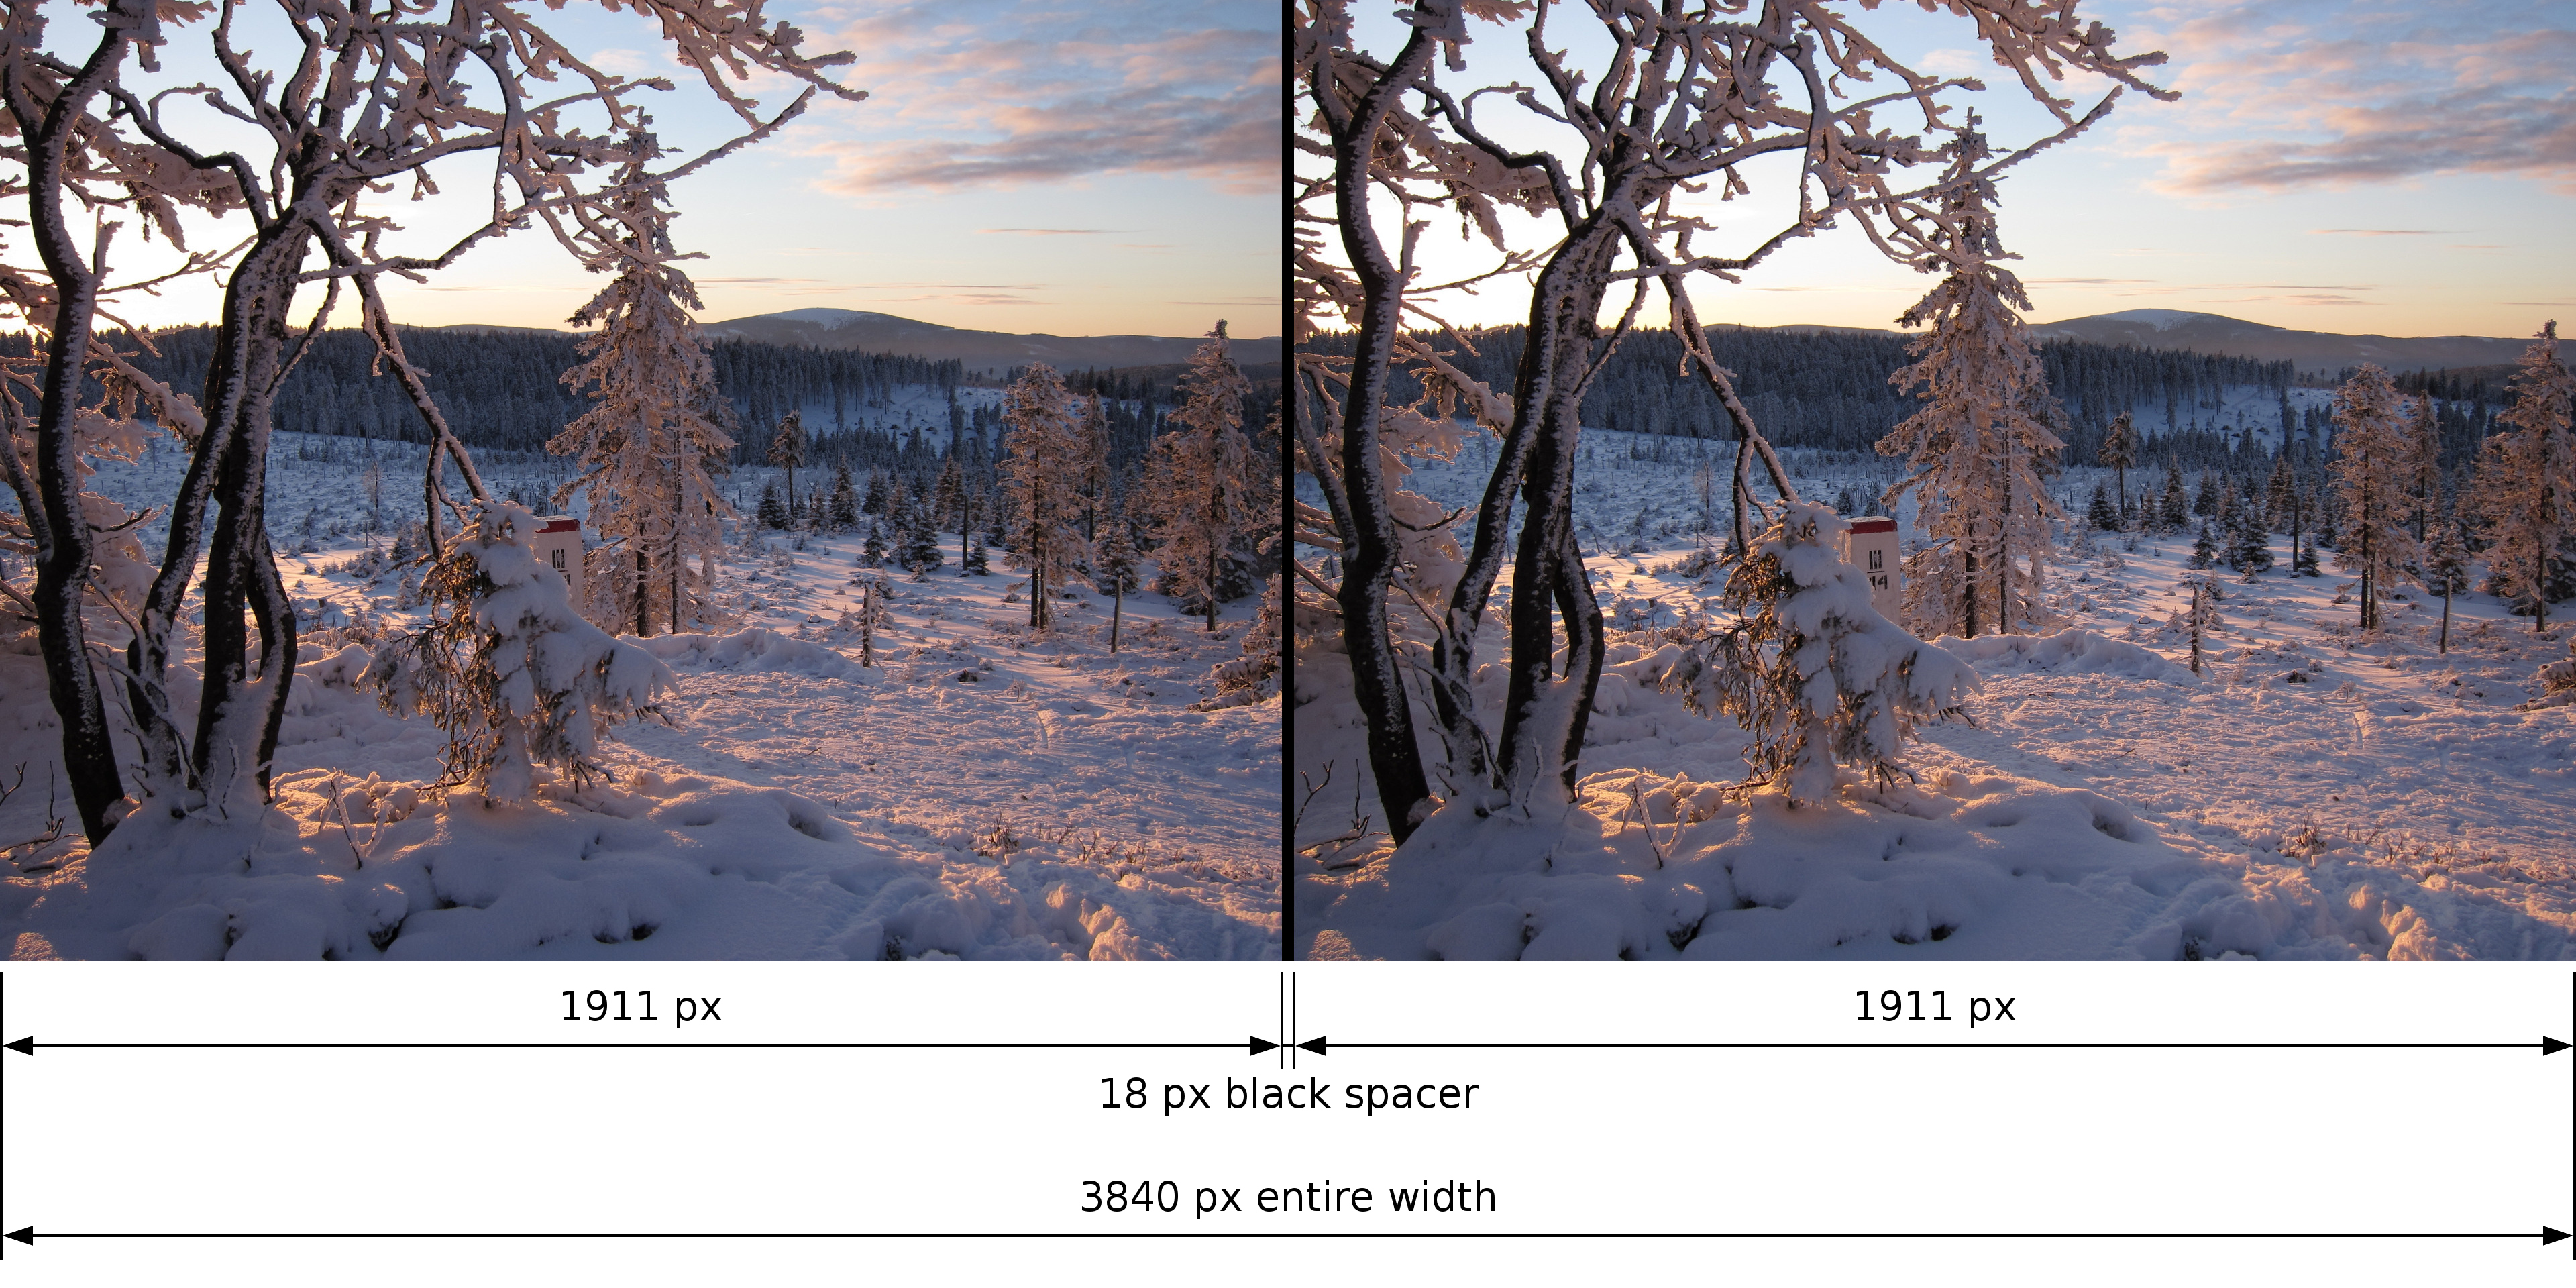
To make the image loading as fast as possible and to be able to use any ordinary image viewer I upload the images to the phone as side-by-side *.jpg files, scaled to fit the 4K dimensions (3840 × 2160 px). Due to the irregular pixel arrangement the images are re-calculated by the phone software any way, but scaling them down beforehand makes the process immediate. Although my stereoscope has a septum to separate the images, I insert an 18 pixel black spacer between the image halves to see a clear stereoscopic window. The resulting formatted images are thus 1911 + 18 + 1911 = 3840 pixels in width (left+spacer+right).
I use a simple script on my computer to batch resize the images and insert the spacer. - If you happen to be a Linux user, feel free to get it at this link.
I am content with the first and only image viewing application I tried, named stereoscope and written by Pierre Meindre. Usually I do not use any of its stereoscopic functions, because my images are already in the correct viewing format, but it does very well all I need:
- I can move through the folder with images (both forward and backward) using the hardware volume button on the side of the phone
- The images scaled to 4K load and display immediately (slow loading was one of the complaints I heard from other users of the Sony 4K phones)
The stereoscope
Lenses
The quality of the lenses is essential to the final viewing experience. I use a pair of excellent achromatic doublets from Jeroen de Wijs, with a focal length of 100 mm and 33 mm diameter.
The 100 mm focal length (FL) is the optimum for a screen of this size, in my opinion. Most other viewers, especially Virtual Reality sets, use shorter focal lengths to increase immersion and even avoid perceiving the image frame. But my preferences are substantially different - I regard the framing of the image and the stereoscopic window as the crucial part of the composition and artistic expression in my photography and I want to see it clearly. As a benefit, viewing the images with a slightly longer FL is more comfortable and relaxing to the eyes. The screen width to the FL ratio pretty much corresponds to the 35 mm slide viewers made in the 50's when used with 7p slides.
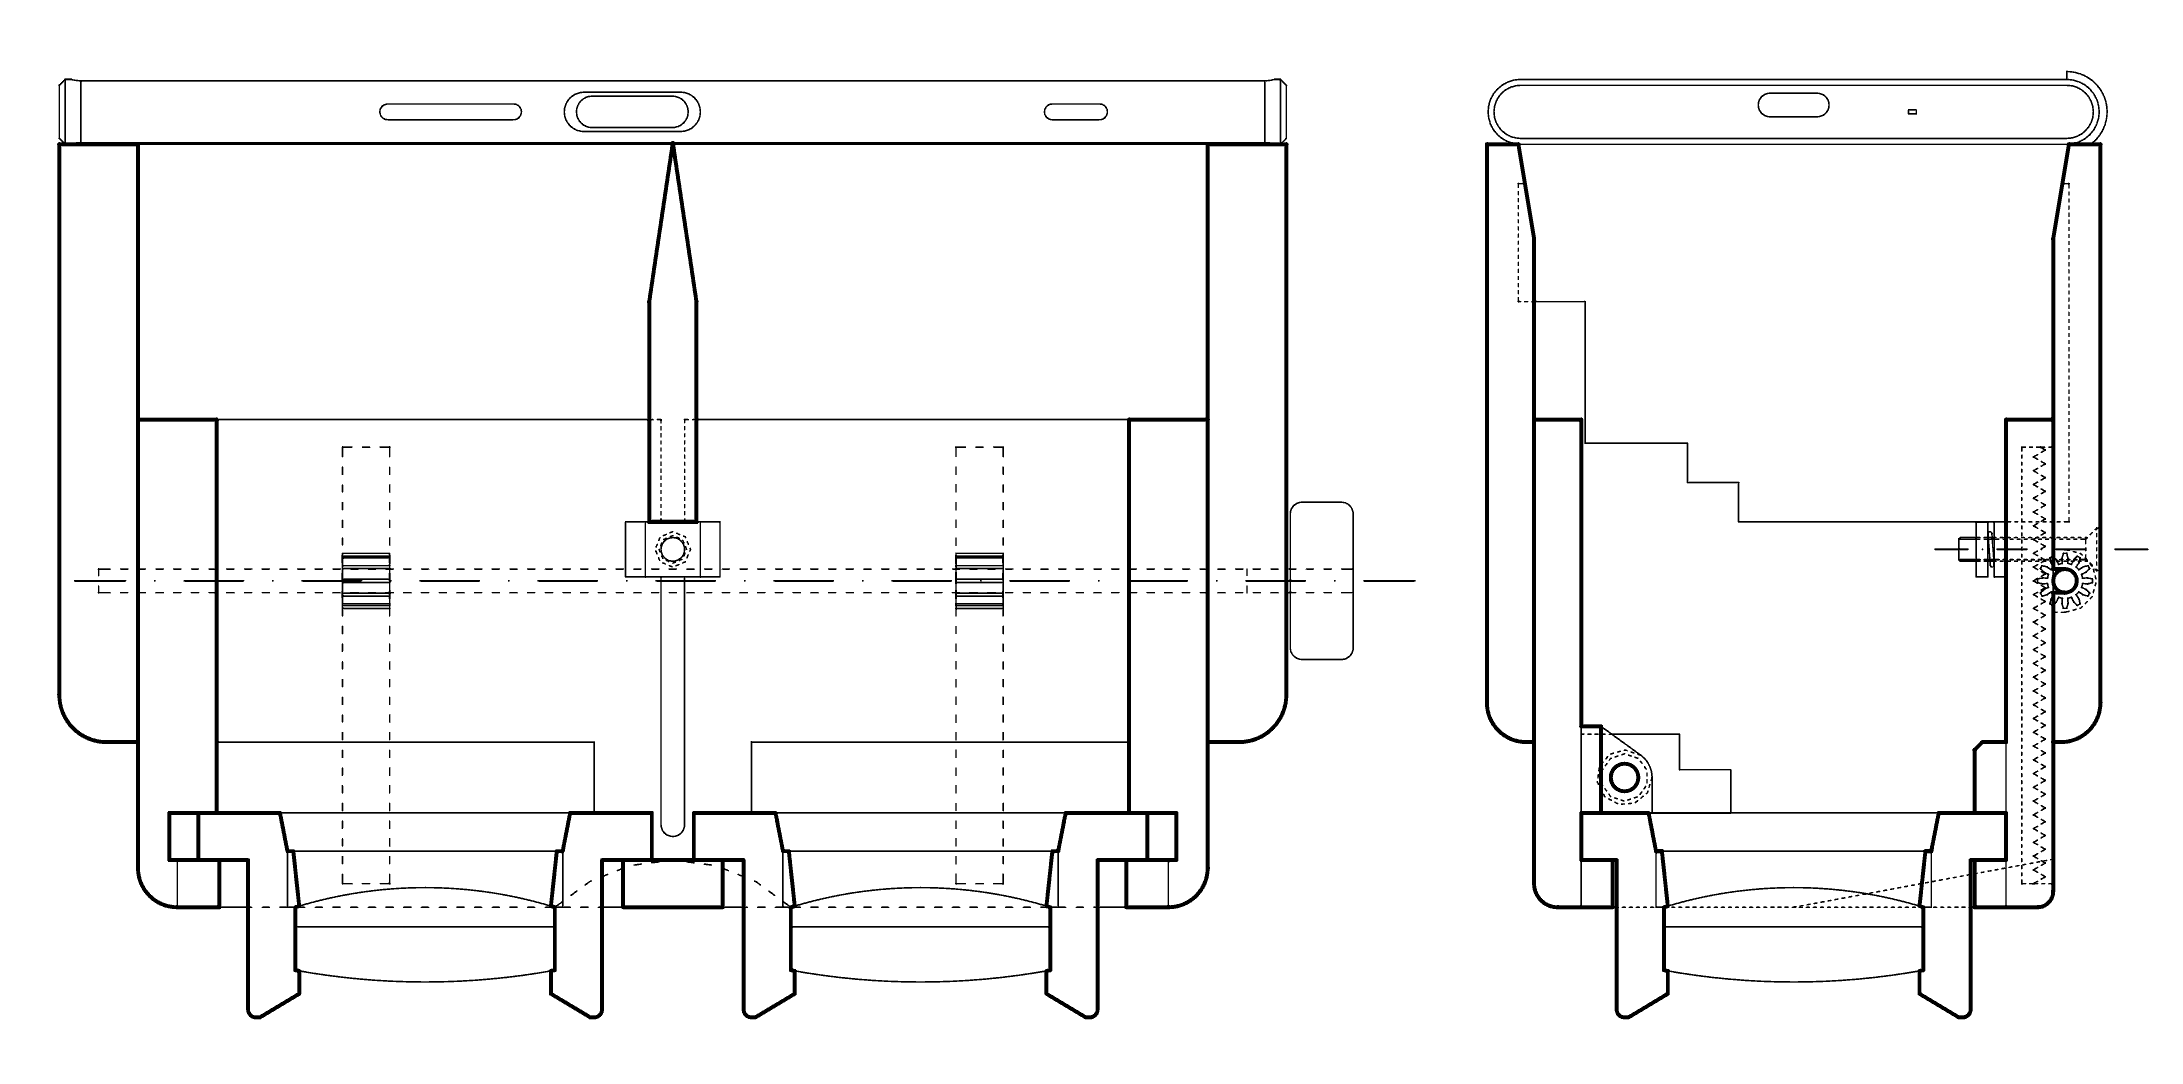
Horizontal and Vertical cross section of the viewer, showing the focusing mechanism
The Design of the Viewer Body
I have chosen to build the viewer from wood for several reasons: wood is enjoyable to work with, it feels nice in the hands - and even smells nice, further enhancing the experience of viewing the image content. My intention was not to imitate the historical 19th and early 20th century stereoscopes. On the contrary, the design is rather original and the details are not typical for traditional joinery.
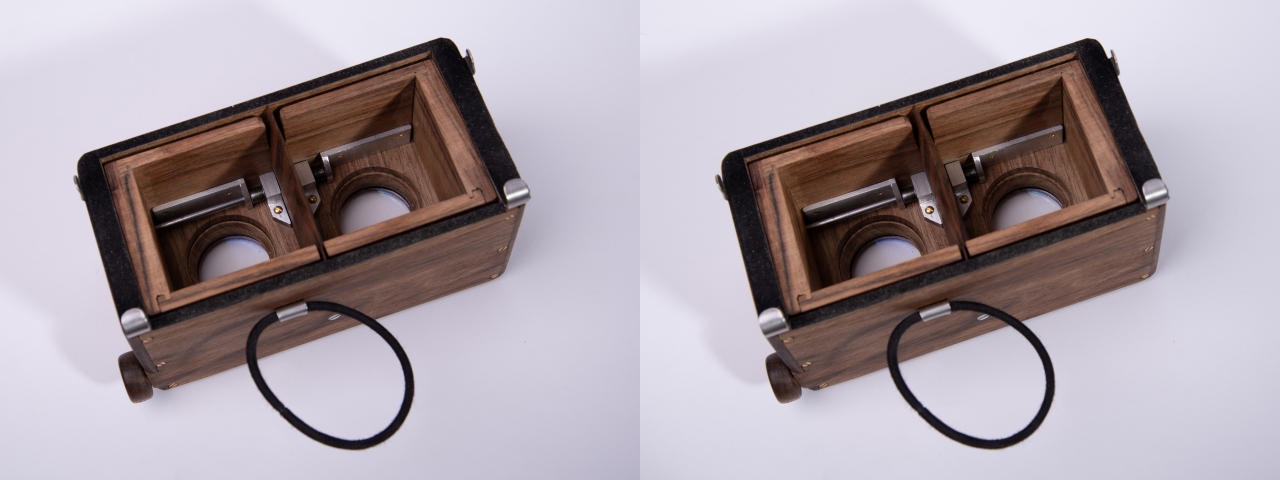
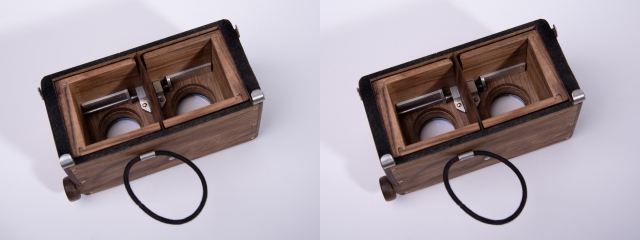
The viewer has a rack and pinion focusing mechanism, designed to allow maximum retraction of the lens part to reduce the size for storage and transportation. When the inner part is fully retracted, the outer shell can be closed with a lid and forms a compact box, protecting the lenses.
I also included a mechanism for adjusting the lens separation with a knob and a left/right thread. But thanks to the sufficient diameter of the lenses, adjusting the interocular distance is not necessary and thus this elaborate contrivance could have been omitted. Optically, 63 mm is the correct separation of the lenses to equal the separation of infinity points on the stereo pair with this size of the screen. So far, this interocular spacing proved to be convenient with every user, including children.
I used walnut wood cut in the garden, seasoned for several years. Walnut is an excellent wood to work with and has a distinctive noble look. The surfaces are just polished and periodically treated with pure linseed oil.
I lack professional power tools in my workshop, so most of the work, including cutting of the boards from split logs, was done by hand. The lens barrels were machined on an improvised lathe built from a hand drill. I used various parts I had at home - the tiny brass focusing pinions come from a toy car, the gear racks are just pieces of thread cut from a large M12 steel screw. The clamps holding the phone were cut from a broken piece of stainless steel kitchenware. I salvaged the part with left and right thread, which is used for the interocular adjustment, years ago from a pair of dumped downhill skiing boots, where it served in the "flex" adjustment mechanism.
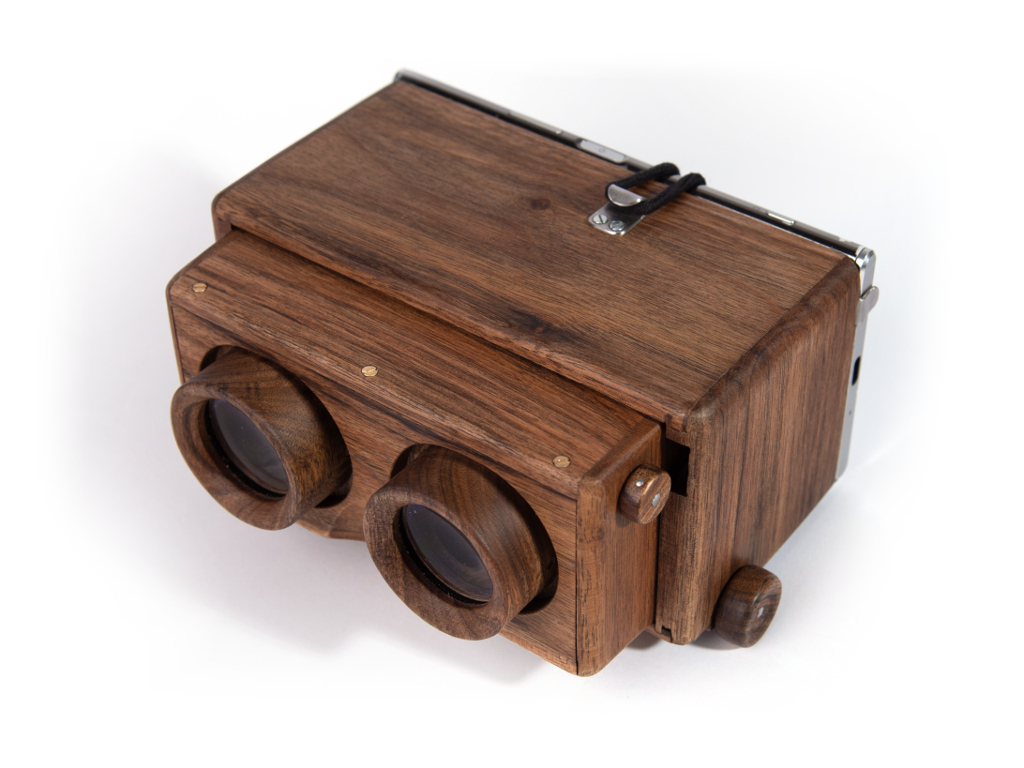
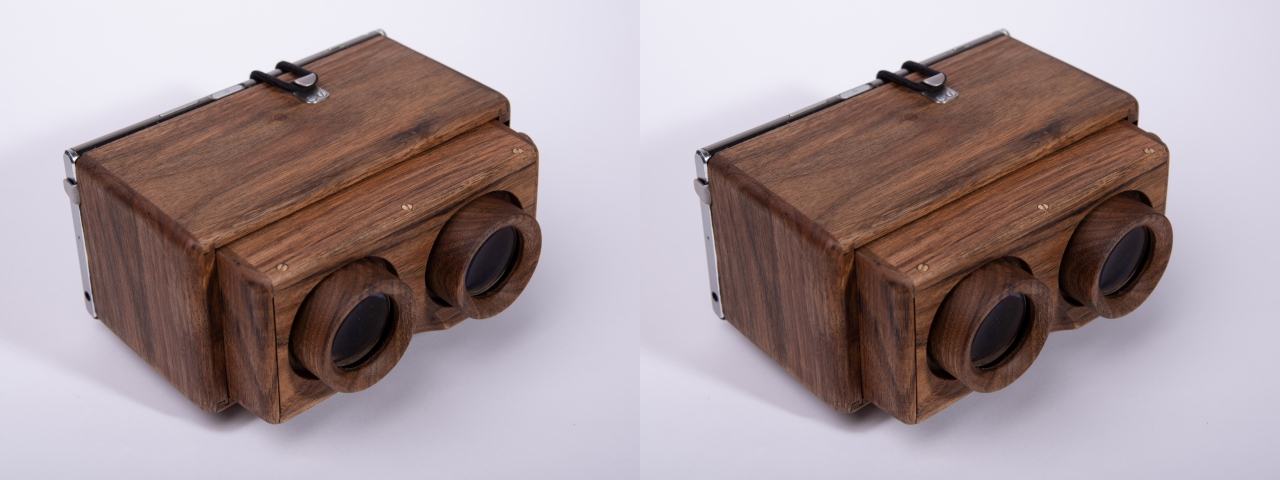
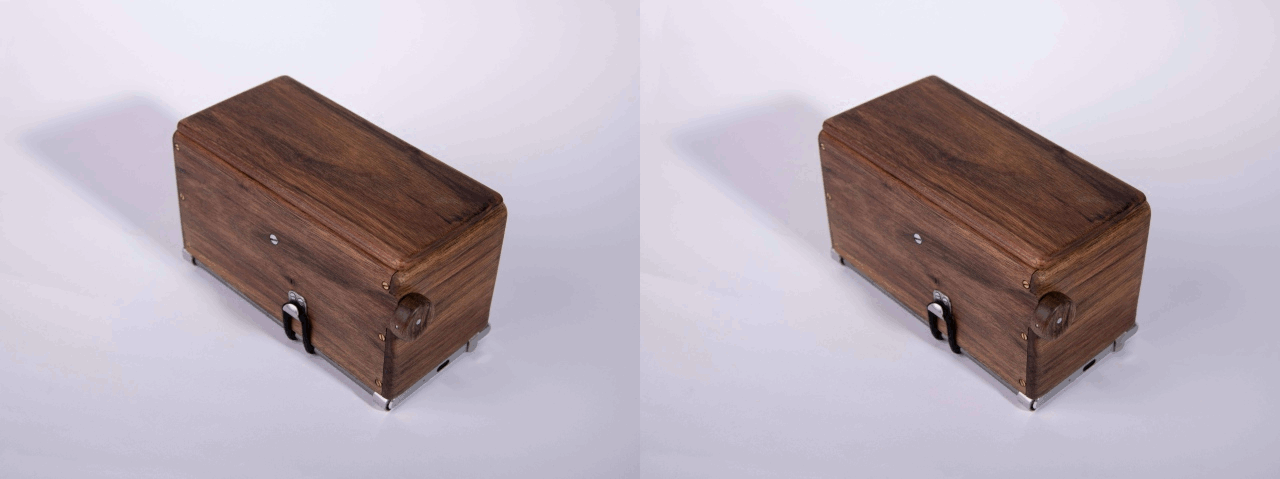
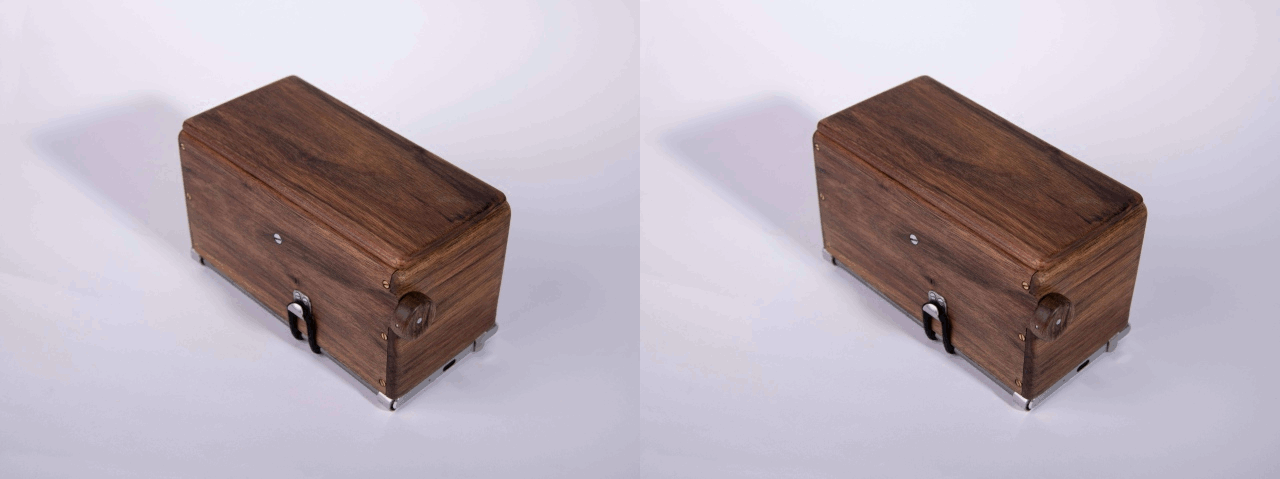
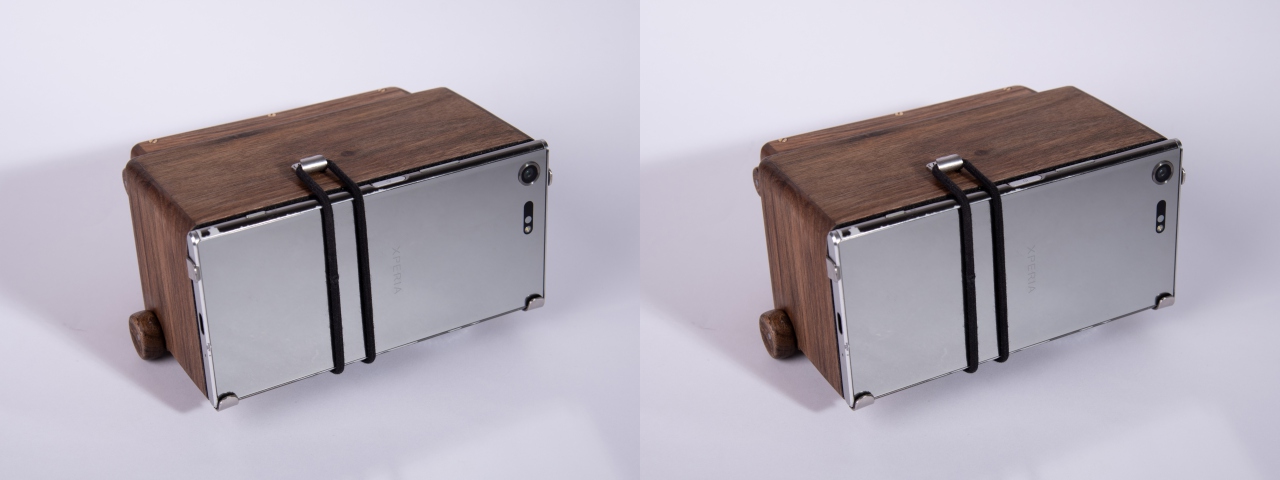
The body of the stereoscope was made as small as possible - the surface is flush with the edges of the phone
(See as crossed view small / crossed view large)
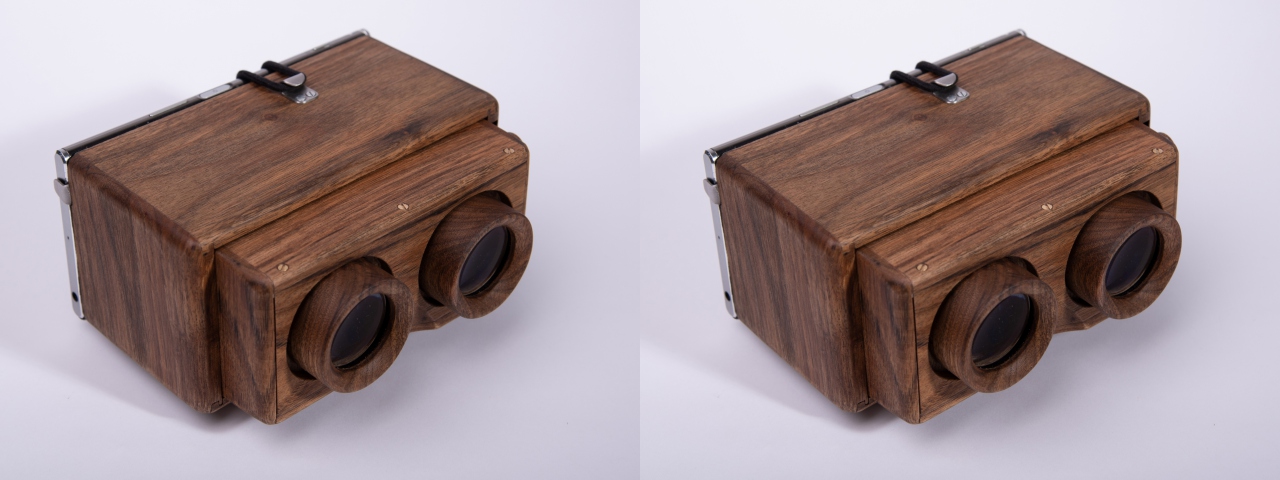
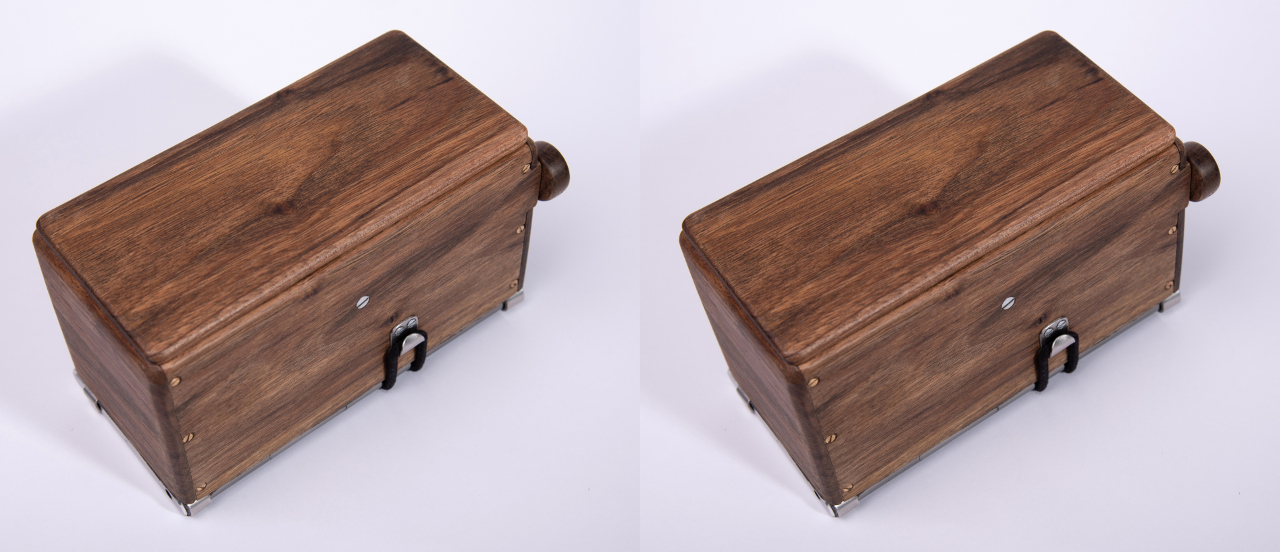
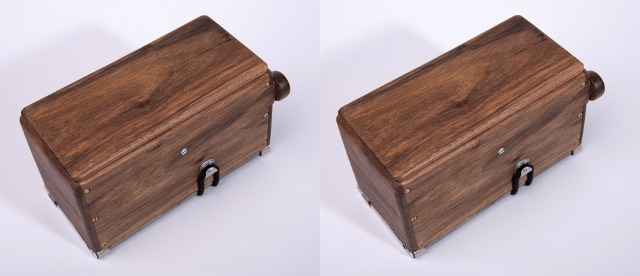
When the inner part is fully retracted, the body can be closed with a lid
(See as crossed view small / crossed view large)
(See as crossed view small / crossed view large)

The phone is held by stainless steel clamps and secured with a rubber band
(See as crossed view small / crossed view large)
The edge of the wooden box where the phone fits is lined with black velvet.
The interocular adjustment mechanism is visible between the lenses
(See as crossed view small / crossed view large)